Saturday, November 23, 2019

setting up postgresql in manjaro linux


This article covers
1. installing postgresql
2. Creating database
3. Create user
4. Configure for remote connections
5. Dbeaver private key issue.

Install Postgresql


source : https://manjaro.site/how-to-install-postgresql-server-on-manjaro-18-0/

sudo pacman -Sy postgresql
sudo su postgres -l initdb --locale $LANG -E UTF8 -D '/var/lib/postgres/data/' exit
sudo systemctl start postgresql sudo systemctl enable postgresql sudo systemctl status postgresql
source : https://wiki.archlinux.org/index.php/PostgreSQL

Create Database

Create your first database/user

Tip: If you create a PostgreSQL user with the same name as your Linux username, it allows you to access the PostgreSQL database shell without having to specify a user to login (which makes it quite convenient).
Become the postgres user. Add a new database user using the createuser command:

CREATE USER

[postgres]$ createuser --interactive
Create a new database over which the above user has read/write privileges using the createdb command (execute this command from your login shell if the database user has the same name as your Linux user, otherwise add -O database-username to the following command):
$ createdb myDatabaseName

Remote Connectivity

Also make sure we can connect from remote hosts
[rprajapa@hpmanjaro ~]$ psql
psql (11.5)
Type "help" for help.

rprajapa=# show config_file;
              config_file               
----------------------------------------
 /var/lib/postgres/data/postgresql.conf
(1 row)

rprajapa=# show hba_file;
              hba_file              
------------------------------------
 /var/lib/postgres/data/pg_hba.conf
(1 row)

Optional configuration

The PostgreSQL database server configuration file is postgresql.conf. This file is located in the data directory of the server, typically /var/lib/postgres/data. This folder also houses the other main configuration files, including the pg_hba.conf which defines authentication settings, for both local users and other hosts ones.
Note: By default, this folder will not be browsable or searchable by a regular user. This is why find and locate are not finding the configuration files.

Restricts access rights to the database superuser by default

The defaults pg_hba.conf allow any local user to connect as any database user, including the database superuser. This is likely not what you want, so in order to restrict global access to the postgres user, change the following line:
/var/lib/postgres/data/pg_hba.conf
# TYPE  DATABASE        USER            ADDRESS                 METHOD

# "local" is for Unix domain socket connections only
local   all             all                                     trust
To:
/var/lib/postgres/data/pg_hba.conf
# TYPE  DATABASE        USER            ADDRESS                 METHOD

# "local" is for Unix domain socket connections only
local   all             postgres                                peer
You might later add additional lines depending on your needs or software ones.

Configure PostgreSQL to be accessible exclusively through UNIX Sockets

In the connections and authentications section of your configuration, set:
/var/lib/postgres/data/postgresql.conf
listen_addresses = ''
This will disable network listening completely. After this you should restart postgresql.service for the changes to take effect.

Configure PostgreSQL to be accessible from remote hosts

In the connections and authentications section, set the listen_addresses line to your needs:
/var/lib/postgres/data/postgresql.conf
listen_addresses = 'localhost,my_local_ip_address'
You can use '*' to listen on all available addresses.
Note: PostgreSQL uses TCP port 5432 by default for remote connections. Make sure this port is open in your firewall and able to receive incoming connections. You can also change it in the configuration file, right below listen_addresses
Then add a line like the following to the authentication config:
/var/lib/postgres/data/pg_hba.conf
# TYPE  DATABASE        USER            ADDRESS                 METHOD
# IPv4 local connections:
host    all             all             ip_address/32   md5
where ip_address is the IP address of the remote client.
See the documentation for pg_hba.conf.
Note: Neither sending your plain password nor the md5 hash (used in the example above) over the Internet is secure if it is not done over an SSL-secured connection. See Secure TCP/IP Connections with SSL for how to configure PostgreSQL with SSL.
After this you should restart postgresql.service for the changes to take effect.
For troubleshooting take a look in the server log file:
$ journalctl -u postgresql.service
Another reference: https://superuser.com/questions/800201/postgresql-connection-refused


Now install DBeaver or pgadmin4 (a GUI to postgresql)
set a password for user using command 
alter role rprajapa with password 'xxxxzzzzz';

To test connection from a remote machine using cli
psql -h 10.2.2.11 -U rprajapa -d rprajapa

DBEAVER Private key issue

IF DBeaver cannot connect to DB with public key and when you add the private key it gives error INVALID PRIVATE KEY :[
run the command to change the format of the key
ssh-keygen -p -m PEM -f /path/to/openssh/key will re-write the private key in the correct format.  (source : https://github.com/rundeck/rundeck/issues/4813#issuecomment-492358649)

Tuesday, November 12, 2019

copy ssh public key to remote server with one command

cat ~/.ssh/id_rsa.pub | ssh $server "mkdir -p ~/.ssh && cat >> ~/.ssh/authorized_keys && chmod 600 ~/.ssh/authorized_keys"

just substitute the $server above with user@remote-server

or I have created a bash script here

!/usr/bin/env bash

usage(){
  echo usage:: $0 -s [user@]\
}

if [ "$#" -ne 1 ]; then
    usage
    exit 1
fi

server=$1

if [ -z $server ]; then
  echo variable \$server is not set
  usage
  exit 1
fi

cat ~/.ssh/id_rsa.pub | ssh $server "mkdir -p ~/.ssh && cat >> ~/.ssh/authorized_keys && chmod 600 ~/.ssh/authorized_keys"

if [ $? -ne 0 ]; then
  echo "Command failed"
  exit 1
else
  echo "Command successful"
fi

Thursday, October 3, 2019

Emacs cheat sheet


C-o
Insert a blank line after the cursor (open-line).
C-x C-o
Delete all but one of many consecutive blank lines (delete-blank-lines).

Saturday, March 16, 2019

Oracle 12c on Redhat 7

https://www.tecmint.com/install-oracle-database-12c-on-centos-7/


Oracle 12c install on Redhat 7 - missing compat-libstdc++-33

Error : missing
compat-libstdc++-33


Where is the compat-libstdc++ package? 


https://access.redhat.com/solutions/300513


  • In RHEL 7, the package has been moved to the optional repository.
    # subscription-manager repos --enable=rhel-7-server-optional-rpms
    # yum install compat-libstdc++-33


Wednesday, January 9, 2019

Enabling EPEL repo in Redhat 7 then install thunderbird

subscription-manager repos --enable "rhel-*-optional-rpms" --enable "rhel-*-extras-rpms"

yum install thunderbird

Friday, March 23, 2018

Configure OpenVPN + PIA CLI on Redhat/Centos 7

Configure OpenVPN + PIA CLI on CentOS 7
(Source : http://web.archive.org/web/20160517121855/http://blog.jordan-english.com:80/configure-openvpn-pia-cli-on-centos-7/ )


login as root or sudo

# yum install epel-release
yum install https://dl.fedoraproject.org/pub/epel/epel-release-latest-7.noarch.rpm
yum install openvpn unzip curl wget easy-rsa

Configure OpenVPN
cd /etc/openvpn
wget https://www.privateinternetaccess.com/openvpn/openvpn.zip
unzip openvpn.zip
vi /etc/openvpn/cred.conf

#supply the following two lines and write/quit (this is supplied by PIA)
[username]
[password]

chown root:root /etc/openvpn/cred.conf
chmod 400 /etc/openvpn/cred.conf
ln -s /etc/openvpn/[PIA-Region-config].ovpn /etc/openvpn/server.conf

vi [PIA-Region-config].ovpn
#add the following lines
auth-user-pass cred.conf
auth-nocache

#create a backup of the DNS config
cp /etc/resolv.conf /etc/resolv.conf.orig

#edit DNS config
vi /etc/resolv.conf
#add the following lines
nameserver 209.222.18.222
nameserver 209.222.18.218

#reset the security context - SELinux labels
restorecon -Rv /etc/openvpn/


#enable OpenVPN to start on boot
systemctl enable openvpn@server.service
#start OpenVPN service
systemctl start openvpn@server.service
#check status of OpenVPN service
systemctl status openvpn@server.service
#check your new IP address - verify with another workstation
curl ipecho.net/plain ; echo

#reboot and check again
systemctl reboot
systemctl status openvpn@server.service
Here is my output from systemctl status openvpn@server.service

 openvpn@server.service - OpenVPN Robust And Highly Flexible Tunneling Application On server
   Loaded: loaded (/usr/lib/systemd/system/openvpn@.service; enabled; vendor preset: disabled)
   Active: active (running) since Fri 2018-03-23 15:56:25 PDT; 16s ago
 Main PID: 10784 (openvpn)
   Status: "Initialization Sequence Completed"
   CGroup: /system.slice/system-openvpn.slice/openvpn@server.service
           └─10784 /usr/sbin/openvpn --cd /etc/openvpn/ --config server.conf

Mar 23 15:56:25 zareason.raka.home openvpn[10784]: Fri Mar 23 15:56:25 2018 T...
Mar 23 15:56:25 zareason.raka.home openvpn[10784]: Fri Mar 23 15:56:25 2018 U...
Mar 23 15:56:25 zareason.raka.home openvpn[10784]: Fri Mar 23 15:56:25 2018 [...
Mar 23 15:56:26 zareason.raka.home openvpn[10784]: Fri Mar 23 15:56:26 2018 a...
Mar 23 15:56:26 zareason.raka.home openvpn[10784]: Fri Mar 23 15:56:26 2018 T...
Mar 23 15:56:26 zareason.raka.home openvpn[10784]: Fri Mar 23 15:56:26 2018 d...
Mar 23 15:56:26 zareason.raka.home openvpn[10784]: Fri Mar 23 15:56:26 2018 /...
Mar 23 15:56:26 zareason.raka.home openvpn[10784]: Fri Mar 23 15:56:26 2018 I...
Hint: Some lines were ellipsized, use -l to show in full.
[root@zareason openvpn]# 


systemctl status openvpn@server.service

You can also check the tunnel that OpenVPN opened

ifconfig tun0

Friday, March 9, 2018

sudo pacman -S archlinux-keyring  && sudo pacman -Syu

Tuesday, February 13, 2018

getting hardware information on Linux

cat /sys/devices/virtual/dmi/id/product_name

/sys/devices/virtual/dmi/id/sys_vendor

sudo lshw
sudo lshw -short

cat /proc/cpuinfo
cat /proc/meminfo


Friday, February 9, 2018

connecting pdb user to oracle 12c gives error ORA-01033

If you connect to a user in a PDB and u get error ORA-01033

and following query returns MOUNTED

SELECT name, open_mode FROM v$pdbs;

then we need to open it in read write mode and save state so that it would survive a shutdown.


sqlplus / as sysdba

SELECT name, open_mode FROM v$pdbs;


alter pluggable database PDBORCL open read write;


alter pluggable database all save state;


Oracle 12c: ORA-65096: invalid common user or role name

SQL> create user rakesh identified by rakesh;
create user rakesh identified by rakesh
            *
ERROR at line 1:
ORA-65096: invalid common user or role name


Fix;

SQL> show con_name

CON_NAME
------------------------------
CDB$ROOT
SQL> select PDB from V$services;

PDB
------------------------------
PDBORCL
CDB$ROOT
CDB$ROOT
CDB$ROOT
CDB$ROOT

SQL> alter session set container=PDBORCL;

Session altered.

SQL> show con_name

CON_NAME
------------------------------
PDBORCL
SQL> create user rakesh identified by rakesh;
create user rakesh identified by rakesh
                                 *
ERROR at line 1:
ORA-01109: database not open


SQL> alter database open;

Database altered.

SQL> create user rakesh identified by rakesh;

User created.


SQL> GRANT CONNECT, RESOURCE, DBA TO rakesh;

Grant succeeded.

SQL>

Saturday, January 20, 2018

Arch Linux - Installing packages from AUR repository

goto https://aur.archlinux.org/

goto Packages tab

select your package to install

copy the git clone url ( copy link location)


Now
open terminal window
cd to Downloads folder

for eg to install google chrome

git clone https://aur.archlinux.org/google-chrome.git


now cd to the directory created

cd google-chrome

makepkg -s
(makes package from the git source files)

(All above commands to be run as regular user)

sudo pacman -U   google-chrome-63.0.3239.132-1-x86_64.pkg.tar.xz
(google-chrome-63.0.3239.132-1-x86_64.pkg.tar.xz was created by the prev command)


thats all. :)

Saturday, January 13, 2018

getting ins_ctx.mk error - Oracle 11g R2 install on centos 7

The information below solved the problem:


Source :

https://www.davemalpass.com/oracle-database-11g-install-on-centos-7/


Oracle Database 11g install on Centos 7

Problem encountered when installing Oracle 11g on Centos 7

Google suggested this was a fairly common problem with machines with a newer GLIBC. Most of the suggested solutions didn’t work for me (writing a glib memcpy shim etc). Instead I was able to statically link this executable against the glibc archive which didn’t have the problem with the missing memcpy@GLIBC reference.
yum install glibc-static.x86_64
yum install glibc-static.i686
vi /u01/app/oracle/product/11.2.0/dbhome_2/ctx/lib/ins_ctx.mk
ctxhx: $(CTXHXOBJ)
-static $(LINK_CTXHX) $(CTXHXOBJ) $(INSO_LINK) /usr/lib64/stdc.a
I additionally had to patch the the ins_emagent.mk to link to the libnnz11 library:
vi /u01/app/oracle/product/11.2.0/dbhome_2/sysman/lib/ins_emagent.mk
Search for the line
$(MK_EMAGENT_NMECTL)
Change it to:
$(MK_EMAGENT_NMECTL) -lnnz11
Then press the Retry button and it should install correctly!

——
ALTER SYSTEM SET PROCESSES=500 SCOPE=SPFILE;
ALTER SYSTEM SET OPEN_CURSORS=500 SCOPE=SPFILE;

Monday, December 11, 2017

multihop socks proxy over ssh

https://superuser.com/questions/332850/ssh-as-socks-proxy-through-multiple-hosts

Friday, December 1, 2017

multihop ssh with PUTTY

source : https://www.vscentrum.be/client/windows/putty-proxy


Setting up a proxy in PuTTY

Setting up the connection in PuTTY is a bit more complicated than for a simple direct connection to a login node.
  1. First you need to start up pageant and load your private key into it. See the instructions on our "Using Pageant" page.
  2. In PuTTY, go first to the "Proxy" category (under "Connection"). In the Proxy tab sheet, you need to fill in the following information:
    1. Select the proxy type: "Local"
    2. Give the name of the "proxy server". This is vsc.login.node, your usual VSC login node, and not the computer on which you want to log on and work.
    3. Make sure that the "Port" number is 22.
    4. Enter your VSC-id in the "Username" field.
    5. In the "Telnet command, or local proxy command", enter the string
      plink -agent -l %user %proxyhost -nc %host:%port
      (the easiest is to just copy-and-paste this text).
      "plink" (PuTTY Link) is a Windows program and comes with the full PuTTY suite of applications. It is the command line version of PuTTY. In case you've only installed the executables putty.exe and pageant.exe, you'll need to download plink.exe also from the PuTTY web site. We strongly advise to simply install the whole PuTTY-suite of applications using the installer provided on that site.
  3. Now go to the "Data" category in PuTTY, again under "Connection".
    1. Fill in your VSC-id in the "Auto-login username" field.
    2. Leave the other values untouched (likely the values in the screen dump)
  4. Now go to the "Session" category
    1. Set the field "Host Name (or IP address) to the computer you want to log on to. If you are setting up a proxy connection to access a computer on the VSC network, you will have to use its name on the internal VSC network. E.g., for the login nodes of the tier-1 cluster Muk at UGent, this is login.muk.gent.vsc and for the cluster on which you can test applications for the Muk, this is gligar.gligar.gent.vsc.
    2. Make sure that the "Port" number is 22.
    3. Finally give the configuration a name in the field "Saved Sessions" and press "Save". Then you won't have to enter all the above information again.
    4. And now you're all set up to go. Press the "Open" button on the "Session" tab to open a terminal window.

Thursday, June 29, 2017

zipimport.ZipImportError: can't decompress data; zlib not available

I got the error

zipimport.ZipImportError: can't decompress data; zlib not available

when I am trying to install Python3.6 from source.


I did the following install

yum install readline-devel  sqlite-devel zlib-devel openssl-devel


and it worked fine then

Friday, May 19, 2017

install Apache tomcat 8 on Centos 7

source : https://www.digitalocean.com/community/tutorials/how-to-install-apache-tomcat-8-on-centos-7


 How To Install Apache Tomcat 8 on CentOS 7

PostedJune 19, 2015 190.7kviews JAVA DEPLOYMENT CENTOS

Introduction

Apache Tomcat is a web server and servlet container that is used to serve Java applications. Tomcat is an open source implementation of the Java Servlet and JavaServer Pages technologies, released by the Apache Software Foundation. This tutorial covers the basic installation and some configuration of the latest release of Tomcat 8 on your CentOS 7 server.

Prerequisites

Before you begin with this guide, you should have a separate, non-root user account set up on your server. You can learn how to do this by completing steps 1-3 in the initial server setup for CentOS 7. We will be using the demo user created here for the rest of this tutorial.

Install Java

Tomcat requires that Java is installed on the server, so any Java web application code can be executed. Let's satisfy that requirement by installing OpenJDK 7 with yum.
To install OpenJDK 7 JDK using yum, run this command:
  • sudo yum install java-1.7.0-openjdk-devel
Answer y at the prompt to continue installing OpenJDK 7.
Note that a shortcut to the JAVA_HOME directory, which we will need to configure Tomcat later, can be found at /usr/lib/jvm/jre.
Now that Java is installed, let's create a tomcat user, which will be used to run the Tomcat service.

Create Tomcat User

For security purposes, Tomcat should be run as an unprivileged user (i.e. not root). We will create a new user and group that will run the Tomcat service.
First, create a new tomcat group:
  • sudo groupadd tomcat
Then create a new tomcat user. We'll make this user a member of the tomcat group, with a home directory of /opt/tomcat (where we will install Tomcat), and with a shell of /bin/false (so nobody can log into the account):
  • sudo useradd -M -s /bin/nologin -g tomcat -d /opt/tomcat tomcat
Now that our tomcat user is set up, let's download and install Tomcat.

Install Tomcat

The easiest way to install Tomcat 8 at this time is to download the latest binary release then configure it manually.

Download Tomcat Binary

Find the latest version of Tomcat 8 at the Tomcat 8 Downloads page. At the time of writing, the latest version is 8.5.9. Under the Binary Distributions section, then under the Core list, copy the link to the "tar.gz".
Let's download the latest binary distribution to our home directory.
First, change to your home directory:
  • cd ~
Then use wget and paste in the link to download the Tomcat 8 archive, like this (your mirror link will probably differ from the example):
  • wget http://apache.mirrors.ionfish.org/tomcat/tomcat-8/v8.5.9/bin/apache-tomcat-8.5.9.tar.gz
We're going to install Tomcat to the /opt/tomcat directory. Create the directory, then extract the the archive to it with these commands:
  • sudo mkdir /opt/tomcat
  • sudo tar xvf apache-tomcat-8*tar.gz -C /opt/tomcat --strip-components=1
Now we're ready to set up the proper user permissions.

Update Permissions

The tomcat user that we set up needs to have the proper access to the Tomcat installation. We'll set that up now.
Change to the Tomcat installation path:
  • cd /opt/tomcat
Give the tomcat group ownership over the entire installation directory:
  • sudo chgrp -R tomcat /opt/tomcat
Next, give the tomcat group read access to the conf directory and all of its contents, and execute access to the directory itself:
  • sudo chmod -R g+r conf
  • sudo chmod g+x conf
Then make the tomcat user the owner of the webappsworktemp, and logs directories:
  • sudo chown -R tomcat webapps/ work/ temp/ logs/
Now that the proper permissions are set up, let's set up a Systemd unit file.

Install Systemd Unit File

Because we want to be able to run Tomcat as a service, we will set up a Tomcat Systemd unit file .
Create and open the unit file by running this command:
  • sudo vi /etc/systemd/system/tomcat.service
Paste in the following script. You may also want to modify the memory allocation settings that are specified in CATALINA_OPTS:
/etc/systemd/system/tomcat.service
# Systemd unit file for tomcat
[Unit]
Description=Apache Tomcat Web Application Container
After=syslog.target network.target

[Service]
Type=forking

Environment=JAVA_HOME=/usr/lib/jvm/jre
Environment=CATALINA_PID=/opt/tomcat/temp/tomcat.pid
Environment=CATALINA_HOME=/opt/tomcat
Environment=CATALINA_BASE=/opt/tomcat
Environment='CATALINA_OPTS=-Xms512M -Xmx1024M -server -XX:+UseParallelGC'
Environment='JAVA_OPTS=-Djava.awt.headless=true -Djava.security.egd=file:/dev/./urandom'

ExecStart=/opt/tomcat/bin/startup.sh
ExecStop=/bin/kill -15 $MAINPID

User=tomcat
Group=tomcat
UMask=0007
RestartSec=10
Restart=always

[Install]
WantedBy=multi-user.target
Save and exit. This script tells the server to run the Tomcat service as the tomcat user, with the settings specified.
Now reload Systemd to load the Tomcat unit file:
  • sudo systemctl daemon-reload
Now you can start the Tomcat service with this systemctl command:
  • sudo systemctl start tomcat
Check that the service successfully started by typing:
  • sudo systemctl status tomcat
If you want to enable the Tomcat service, so it starts on server boot, run this command:
  • sudo systemctl enable tomcat
Tomcat is not completely set up yet, but you can access the default splash page by going to your domain or IP address followed by :8080 in a web browser:
Open in web browser:
http://server_IP_address:8080
You will see the default Tomcat splash page, in addition to other information. Now we will go deeper into the installation of Tomcat.

Configure Tomcat Web Management Interface

In order to use the manager webapp that comes with Tomcat, we must add a login to our Tomcat server. We will do this by editing the tomcat-users.xml file:
  • sudo vi /opt/tomcat/conf/tomcat-users.xml
This file is filled with comments which describe how to configure the file. You may want to delete all the comments between the following two lines, or you may leave them if you want to reference the examples:
tomcat-users.xml excerpt

...

You will want to add a user who can access the manager-gui and admin-gui (webapps that come with Tomcat). You can do so by defining a user similar to the example below. Be sure to change the username and password to something secure:
tomcat-users.xml — Admin User

    admin
" password="password" roles="manager-gui,admin-gui"/>
Save and quit the tomcat-users.xml file.
By default, newer versions of Tomcat restrict access to the Manager and Host Manager apps to connections coming from the server itself. Since we are installing on a remote machine, you will probably want to remove or alter this restriction. To change the IP address restrictions on these, open the appropriate context.xml files.
For the Manager app, type:
  • sudo vi /opt/tomcat/webapps/manager/META-INF/context.xml
For the Host Manager app, type:
  • sudo vi /opt/tomcat/webapps/host-manager/META-INF/context.xml
Inside, comment out the IP address restriction to allow connections from anywhere. Alternatively, if you would like to allow access only to connections coming from your own IP address, you can add your public IP address to the list:
context.xml files for Tomcat webapps


Save and close the files when you are finished.
To put our changes into effect, restart the Tomcat service:
  • sudo systemctl restart tomcat

Access the Web Interface

Now that Tomcat is up and running, let's access the web management interface in a web browser. You can do this by accessing the public IP address of the server, on port 8080:
Open in web browser:
http://server_IP_address:8080
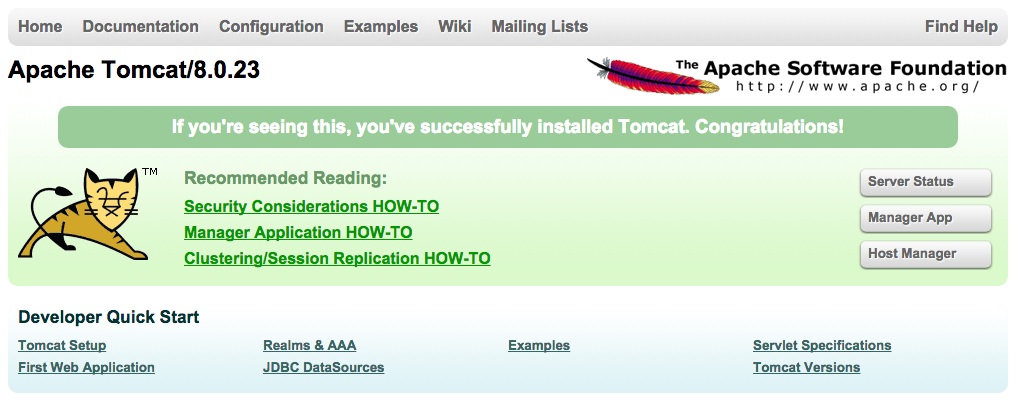
You will see something like the following image:
Tomcat root
As you can see, there are links to the admin webapps that we configured an admin user for.
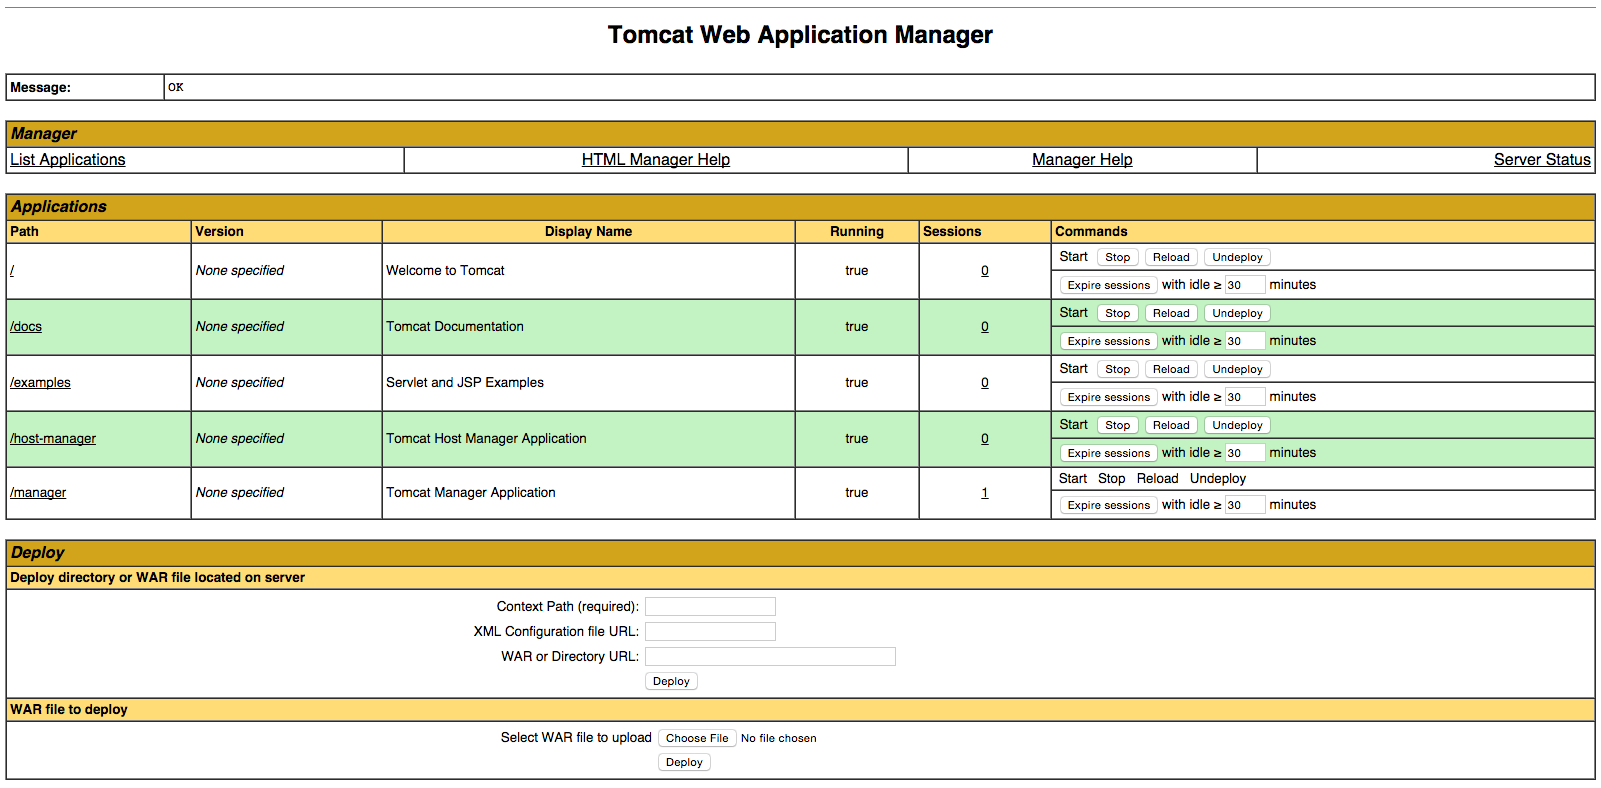
Let's take a look at the Manager App, accessible via the link or http://server_IP_address:8080/manager/html:
Tomcat Web Application Manager
The Web Application Manager is used to manage your Java applications. You can Start, Stop, Reload, Deploy, and Undeploy here. You can also run some diagnostics on your apps (i.e. find memory leaks). Lastly, information about your server is available at the very bottom of this page.
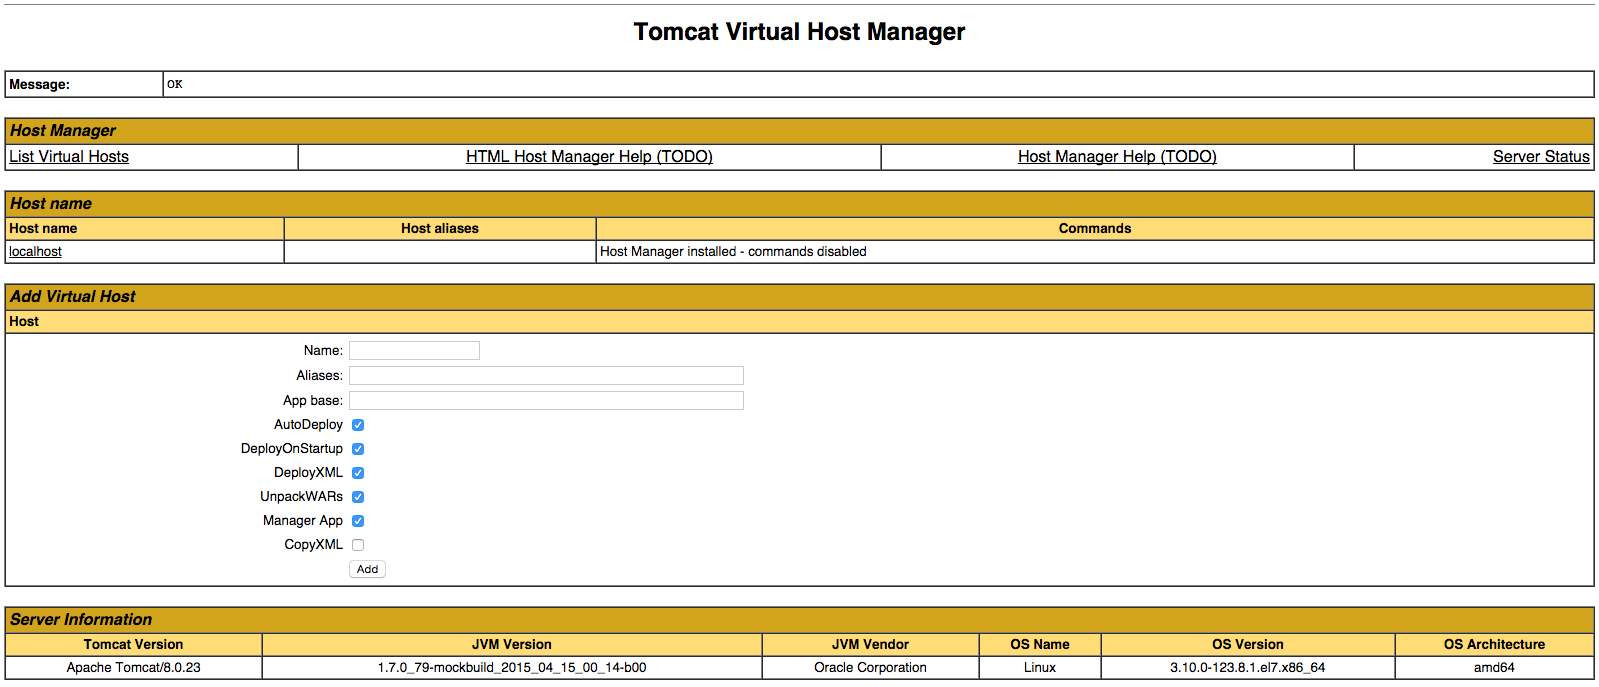
Now let's take a look at the Host Manager, accessible via the link or http://server_IP_address:8080/host-manager/html/:
Tomcat Virtual Host Manager
From the Virtual Host Manager page, you can add virtual hosts to serve your applications from.

Conclusion

Your installation of Tomcat is complete! Your are now free to deploy your own Java web applications!

Followers

About Me

Torrance, CA, United States